|
USER'S
MANUAL
Introduction
|
 |
| ELECTRONIC
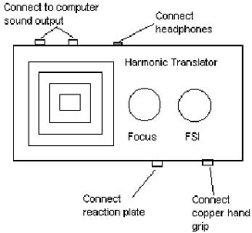
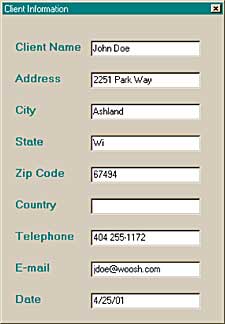
KINESIOLOGY “THE KNOWING TOUCH” Using Electronic Kinesiology with the H T System Reaction Plate The use of EK with the H T System does not require any special sensitivity or extra sensory perception. As with manual forms of kinesiology like muscle testing, what is happening is the perception of information, a conversation between the practitioner who is asking questions and the client's body which is giving answers. With the H T System, the computer poses the programmed questions and the operator detects and measures the answer. The use of the reaction plate and the measurement software allow for a high degree of accuracy and simplicity of use. To begin, one must first become familiar with the tactile feeling one is going to use as a cue. You will need a small amount of cornstarch for this exercise. Corn flour will not work and talcum powder will damage the reaction plate surface. The corn starch is used to absorb the excess oil on the fingers to enhance the process. If your skin is oily you will need more and if it is dry you will need little or none. If you have just washed your hands with soap you will have a harder time feeling the sensations. With the reaction plate on a flat surface in front of you, with no cables connected to it, put a small dab of the cornstarch on the plate. With the tips of you fingers (it does not matter which hand) make small circular rubbing motions on the plate. Press harder until you feel a sticking, catching feeling. It may even make a sound as it does this. This sticking feeling is the cue you will later use to identify reading levels, medicinal items and instrument settings. Take your time and become familiar with this process. As you practice, you will note that you can use less and less pressure on the fingertips and still make the sticking happen. With enough practice, you will detect no change in pressure and it will seem as though you can direct the sensation to happen with your mind. Next, write down a list of simple questions that have a yes or no answer that you already know. Now as you read a question and say yes or no in your mind, punctuate the "yes" with the sticking sensation on the plate. For no, there is no sensation. This is practicing hand, eye, mind coordination with the plate and is the simple skill you will soon use to take readings and set up treatment sessions. It is recommended that you practice this simple procedure for twenty minutes several times to establish the new reflex patterns. If you are having trouble, more practice is called for. Basic Operation of the Harmonic Translation System 9.3 Client Information When first starting a session it is recommended to go to File on the main "top" menu bar and click on Client Information. In the client information dialog box you may enter as much information as needed for this client. This step is optional. If you do not put client information into the dialog box, it will not automatically appear on client records when you save them. Close the client information box when you are finished. |
 |
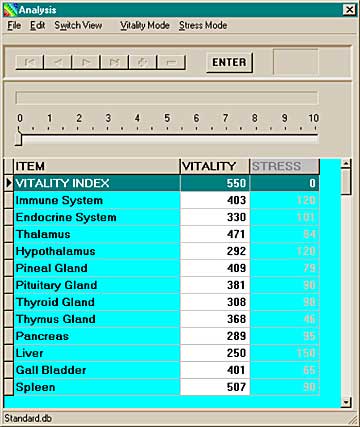
| ANALYSIS Making Sense of H T Analysis Readings Vitality Index reading: The first reading at the top of most lists is Vitality Index. This reading is always between 500 and 700 and is used to adjust the reading to the individuals energetic levels. All subsequent readings in Vitality Mode will be compared to the Vitality Index. There are two categories of analysis readings. Vitality readings are a measure of the relative level of energy present or the potential level of an energetic response. Vitality readings are always read relative to the Vitality Index reading which is the individual's base line reading for the current session. Vitality readings that are within 200 points of the Vitality Index are considered good. Vitality readings that are below 200 points of the index are considered too low. For example, with an index reading of 550 the liver is found to read 250. That is 300 points below the index and indicates that the liver is energetically very low. When taking readings on food items or supplements, a vitality reading that comes as close as possible to the index is an indication that that food or supplement is good to include in the diet. If the reading on the food or supplement item is below 200 points of the index, that item should be avoided. Stress readings are a measure of distress in tissues or the potential for such distress. Stress readings are not compared to the vitality index reading. Any stress reading below 100 is considered negligible. Any stress reading over 100 can be significant. A stress reading of 200 is very high and most often is causing noticeable problems. For example, the liver vitality reading is 250, the liver stress reading is 150 and the Vitality index is 550. This would indicate that the liver is energetically low with a high level of stress. |
 |
| Select
Open Analysis List from the File function on the
analysis window menu bar. Select the analysis list
you wish to use by double clicking on the desired
one. With the analysis list loaded, you are ready to start taking readings. Be sure to place the hair sample of the person being tested on the square design of the translator device. The first reading at the top of most lists is Vitality Index. This reading is always taken between 500 and 700 and is used to adjust the reading to the individual. All subsequent readings in Vitality Mode will be compared to the Vitality Index. Click on the first item of your list (Vitality Index), then click on Vitality Mode from the menu bar to enter vitality mode. With your mouse cursor, click and drag the indicator arrow across the scale until you feel the reaction on the reaction plate between 500 and 700. Click on the ENTER button to enter the reading. Note: There is no stress reading taken for Vitality Index. Click on the next item of your list, click on Vitality Mode, click and drag the indicator arrow across the scale until you feel the reaction on the plate. Click on ENTER to enter this reading. You will note that as you drag the arrow across the scale, the color of the indicator changes from red, which indicates a vitality reading below 200 points of the index, to gray which indicates a borderline poor reading, to green, which indicates a good vitality reading that is within 200 points of the index. Most vitality readings are in the 200 up to the Vitality Index range. A vitality reading that is above the Vitality Index can indicate an overly energetic condition. Next, click on Stress Mode. Drag the indicator across the scale until you feel the reaction. You will note that the color of the indicator bar is green (indicating no stress) before 100 and is red (indicating stress) above 100. Click on ENTER to enter this reading. Most stress readings will fall in the 0 to 200 range. Repeat this process for all the readings on this list that you wish to take. When you have taken all of the readings on this analysis list that whish to take, click on Append Readings To Client Record from File on the menu bar. This adds the readings you have just taken to the client record. You can then open another analysis list and take further readings if you wish. When finished, click on Append Readings To Client Record to add the additional readings to the clients record. Target Area Readings: At the end of most analysis lists there is an item called Target Area. This space is used to take readings on whatever area is within a target box on the anatomical image displayed in the Translation window. You can display both the Analysis window and the Translation window on screen at the same time by click and dragging them by the top tool bar to the sides of the screen as needed. This enables you to see the targeted area on the anatomical chart while taking the analysis readings. Saving Client Records: When finished taking readings, click on Switch View from the menu bar to review the analysis. You can edit and make notes on the analysis at this time if you wish. You can then save the client's analysis by clicking on Save Client Record form the File drop down menu. Give the file any name you whish and save it to any folder on your hard drive. Be sure to give each new file a new file name so as not to overwrite an old client file. Example, john doe 1, john doe 2. Some practitioners like to create a file folder for each client and use dates as individual file names so as to make looking up a client's records as easy as possible. In this case the file folder could be called john doe and the individual files named for the dates of the sessions. Printing Client Records: Click on Switch View and then click on Print form the file drop down menu. Note: You must have clicked on append client record before you can see the record in Switch view and print or save it. Note: You must click on Switch View before you can save or print a client's record. Note: Use Word Pad in Windows to view edit and print out saved client records. Creating a New Custom Analysis list: Select Create Analysis List File from the File menu. Name your new list and hit Save. From the File menu, click on Open Analysis list, select your new list file. From the Edit menu select Modify Analysis List Item's. Note that the list already has Vitality Index as the first item and end of list as the last. Click on the end of list item and then click on the + button from the edit menu bar. A new blank space appears above the end of list entry. Type in the name of the analysis item you whish to enter and click on the ENTER button or hit the Enter key. Then click on the end of list space again and click on the + button to enter the next item. Repeat this process as needed to create any list for analysis you may need. You can delete or change any item on any list by clicking on it in edit mode and hitting the + button to rename it. Translation: Translation is the process where by the operator composes the healing session for the client. The term "translation" refers to the process of translating healing information into the complex frequency shifts used in Harmonic Translation to deliver healing information. Use of the Harmonic Translation System is divided into three levels. Level one, the most basic user level, can be immediately achieved by anyone who can turn his or her computer on. At this level, the user selects a precomposed treatment from a menu based on symptoms one wishes to alleviate or a known condition one wishes to treat. If an inappropriate treatment is selected, there is no effect and no harm is done. Level two is where most users operate. Here one uses the electronic kinesiological interface to analyze the problems and compose individualized treatment sessions. Medicinal items are selected from the electronic dispensary, loaded into energetic envelopes made of sound, light, and geometry and delivered to the client as a synthesized electromagnetic signal or a homeopathic remedy that the system produces. This same remedy may also be delivered as sounds and or colored geometric images. Research involving the testing of medicines, herbs, energies and existing modalities can be done at this level. Level three is where a creative user synthesizes totally new and unique medicinal items based on individuals needs. These level three electronic medicines fit the client's problems like a key fits a lock. The creation of these healing patterns and frequencies is not difficult. Level three competency tends to organically develop out of ones work at level two. Research into totally new electronic medicines and therapies is done at this level. Note: before composing a translation session, have the client's hair sample on the translator device, set the FSI knob to 0, and set the focus knob by moving it first to the right (+) and then to the left (-) until you feel a response on the reaction plate. Opening and running a pre-composed healing session: To open a pre-composed healing session, click on File from the Translation window menu bar. Click on Open Translation. Select the session you whish to run. You may want to use the reaction plate to test for the best session that fits your client's needs by running the cursor over the list of session files until you feel a reaction. Double click on the indicated session file to open it. When you are ready to run the session, click on OK. The selected Session will begin. To stop or interrupt the session, click on End Session. You may edit any of the session parameters before you begin to run the session if you desire. To do this you must click on OK then click on End Session. You can edit the parameters of the session and then start it again. If you wish to save this new (edited) version of the session, click on File and then Save Translation / Make E Capsule. Click on Save File, Give the file a new name and hit save. |
 |
| Composing a
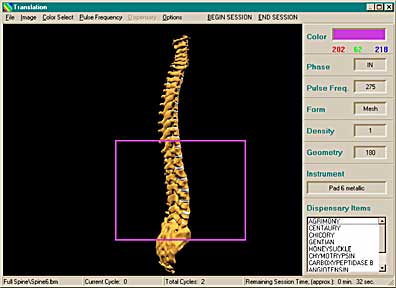
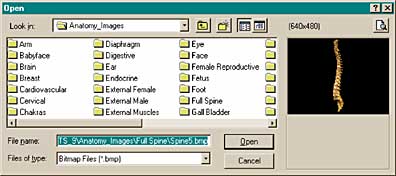
healing session: Image: Start by selecting an anatomical image of the body, body part, organ system or organ that is the focus of the work you wish to do. Image selection is optional. Click on Image from the translation menu bar. Select the category folder that you think appropriate. Click on the image file you think appropriate. A thumbnail sample of the image will appear. If this image is the one you wish to use, double click on the file or click on open. If you wish to work on only a part of the anatomy displayed, you can use your mouse to click and drag a target box over the part of the image you wish to effect. Adding a new image: You can add any new image to the H T System so long as it is in bit map (.bmp) format. Images work best when they are no larger than 640 by 480 pixels. Drawing a target box to focus the healing effect: Whenever you have an image displayed in the Translation window you can define the area you wish to work on with a target box. With your mouse, go to the upper left hand corner of the area you wish to work on, click and drag the target box to any size needed. You can make the target box as large as the whole image if you wish or as small as needed. If you do not draw a target box on the displayed image, the healing effect of the session will be full body. |
 |
| If
you wish to effect the whole area of the displayed
image, it is best to click and drag a large target box to fill the whole image or at least all of the anatomy displayed in that image. Dispensary: |
 |
| Click
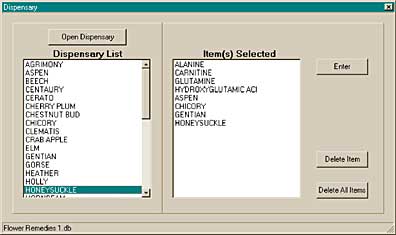
on Dispensary from the translation menu bar. Click
on Open Dispensary to view the available
categories of electronic medicinal items. Use
scroll bars to view all categories. Select the
category you wish or use the cursor to point to
one category after another as you feel for a
reaction on the reaction plate. Open the category.
The items in that category are now shown. Run the
cursor down the list of medicinal items feeling
for a reaction on the reaction plate. When you are
sure an item has given you a reaction, double
click on that item to add it to the Items Selected
window (treatment buffer ). Select as many items
from as many categories as you desire. If you wish
to delete a selected item, click on that item in
the Items Selected window and click on Delete
Item. When you have finished selecting medicinal
items, click on Enter. You cannot delete
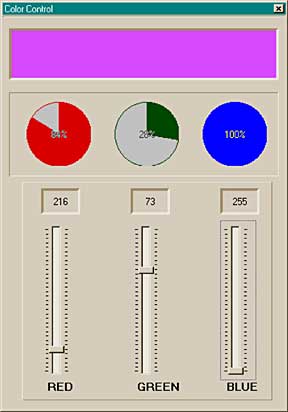
individual items after you have hit Enter. Note: Selecting dispensary items is required to run a treatment. If you wish to run a treatment with no dispensary items, select the category Blank and select the item Blank. Creating the energetic envelope: After you have selected the electronic medicinal items to be run in the current session, you must create the energetic envelope to contain and deliver the medicinal information. The steps in creating the energetic envelope are Color Select, Pulse Frequency and Options. |
 |
| Pulse Frequency: |
 |
| Select
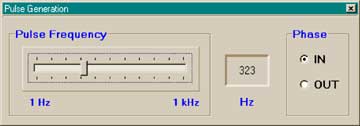
Pulse Frequency from the Translation menu bar.
Feel for a reaction on the reaction plate as you
point your cursor at the IN or OUT in the Phase
section of the Pulse Generation window. Click on
the one that gives you the reaction. In general,
In phase is best for promoting new patterns and
out of phase is best for antidoting old patterns.
It is always recommended to test for the phase
setting with the reaction plate. Click on the Pulse Frequency slider and drag it to where you feel the reaction on the reaction plate. You can then fine tune the setting with the right / left arrow keys. Close the Pulse Generation window when you are satisfied with the Pulse Frequency setting. Options: |
 |
| Geometry
is a subtle adjustment that tilts the plain of
expression for the treatment in and out of three
and four dimensional space. This is useful for
targeting the healing information to subtle
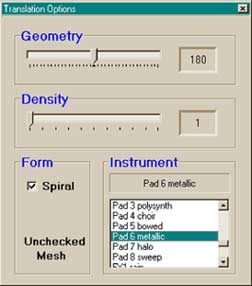
spatial coordinates so as to be most effective. This setting is optional and can be left at the default setting. Default setting is 180. To tune the Geometry setting, slide the slider bar back and forth until you feel a reaction on the reaction plate. Density is an adjustment from subtle (1) to gross (200) in terms of the energetic expression of the healing information. This setting matches the level of expression of the healing session to that of the energetic disorder. With your mouse, slide the Density slider bar to the right as you feel for the reaction on the reaction plate. You can also move the slider by using the right / left arrow keys. This setting is optional and can be left at the default setting. Default setting is (1). Form is a choice between Spiral (box is checked) and Mesh (box is unchecked). Spiral is used when focusing the healing action on a point within the displayed anatomy image. The target area to be effected should be in the center of the target box. Mesh is used when all of the target box area is to be equally effected. Focus and FSI settings on the translation device: Focus: The purpose of the focus adjustment is to compensate for distortions in local electromagnetic fields. The focus knob should start out in the center position. Turn the knob back and forth one or two times until you feel a reaction on the reaction plate. This is the electromagnetic focal point of highest resolution for the electromagnetic information being output on the translator device. FSI: Before running a healing session, you must set the FSI knob on the translator device. FSI (Frequency Shift Intensity) is analogous to potency in homeopathy. (0) being the lowest potency setting and 10 the highest. Starting at 0 turn the knob clockwise until a reaction on the reaction plate is felt. This is an approximate comparison of FSI levels and homeopathic potency. Homeopathic Potency Level 6C 12C 100C 200C 100M 100CM 100MM IIIIIIIIIIIIIIIIIIIIIIIIIIIIIIIIIIIIIIIIIIIIIIIIIIIIIIIIIIIIIIIIIIIIIIIIIIIIIIIIIIIIIIIIIIIIIIIIIIII 0 1 2 3 4 5 6 7 8 9 10 FIS setting Creating a homeopathic type remedy: If you wish to transcribe the healing information of this session into a homeopathic medium such as a dropper bottle of water, place the bottle on the translator device. You can place it right on top of the hair sample. Running the healing session: Select Begin Session from the menu bar. The Duration window comes up and you must select the number of cycles for the healing session. One cycle is a complete run of all of the healing information set up in the current session and is the minimum treatment run time. Use the slider or the up / down arrow keys to slide the cycle indicator to where you feel the reaction on the reaction plate. This will be the optimum number of cycles for the current session. The estimated run time is displayed. Click OK to begin the session. As the session runs, the time remaining is updated at the beginning of each cycle. The time to run each cycle is determined by how many medicinal items are selected and the speed of your computer. You can abort the session at any time by clicking on End Session. Saving the Translation Healing Session: To save the current translation session, click on Save Translation / Make e-Capsule from the File function on the menu bar. Click on Save File. It is recommended that you create a new folder named for each client and place their healing session files in it. Once saved, the sessions can be opened and run at any time. |
 |
| Making an
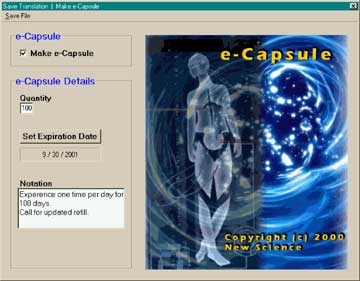
e-Capsule from a translation session: Any complete translation healing session can be transcribed into e-Capsule form for easy transmission via e mail to a client. Click on File from the menu bar and click on Save Translation / Make e-Capsule. Check the Make e-Capsule box. Enter the number of doses (times the treatment will run on the clients computer). This can be 1 to 999. Click on Enter Expiration Date. Click on the day of the year that you want the e-capsule to expire. Double click on the blue date bar to confirm the expiration date. Enter any notes to the client about using the e-Capsule in the Notation box. Click on Save file and name the e-capsule file. Click on Save. The e-Capsule file will be saved in the e-Capsule folder on your hard drive. The session that the e-Capsule was derived from will also be saved in the sessions folder on the hard drive. Note: It is best to use a large (full screen) target box or at least as large as is practical when making an e-Capsule so that the display on the e-Dispenser will be sufficiently large. To send the E-Capsule to a client with e mail, simply send as an attached file with your e mail message. The client simply clicks on the attachment and directs the computer to put it in the eCapsule folder of their e-Dispenser program. Remember, your client must have the e-Dispenser program on their computer to be able to run the e-Capsules. The e-Dispenser program can be downloaded for free from the New Science web site at www.electronichealing.com . Using the Data Matrix utility to enter new medicinal items into the Dispensary: From the Utilities menu select Dispensary Data Matrix. To add a medicinal item to an existing category, first select Open Category form the data matrix File menu. Select the category you wish to add to and double click on it. Next click on New Matrix from the menu bar. Now type in the name of the new item. Place the sample of the medicinal item on the translator device. Be sure that the FSI setting is at 0. With your hand on the reaction plate, use your mouse cursor to slowly move down the left hand column of the matrix until you feel the reaction on the plate. Click on the matrix square that gives you the reaction. Move to the next column and repeat the procedure. When you have registered a number in each of the thirteen columns select Enter Matrix from the menu bar. Then from the File menu select Save Matrix. Your new item now appears in the list of items in the selected category. To delete an item from a category, simply hi light the item from the category list and click on the (-) button. To create a new dispensary category , select Make Category from the file menu. Type the name of the new category and hit Save. To then add items to this new category, select Open Category and click on the new category and repeat the procedures above. Harmonic Translation System 9.3 www.electronichealing.com copyright: New Science 2017 |